CapCut to Premiere Pro — How to Move a CapCut Edit Into a Pro Workflow
By Ethan Mai — 20 years in post-production, built and ran a 70-person editorial facility.
Disclosure, up front: one of the approaches in this article uses CutSmith Timeline Bridge, an open-source tool I develop. I’ve marked its current limitations as plainly as its capabilities — read it as a builder’s honest status report, not a pitch.
Let me say this first, because it’s true: CapCut is a genuinely excellent piece of editing software — imaginative in a way most NLEs aren’t. The sheer asset library it puts at your fingertips — licensed music, stickers, sound effects, filters, effects — is built with a convenience that traditional NLEs have never matched. It deserves its success.
The flip side: when it comes to getting your data out, CapCut is extremely closed. That’s understandable from where they sit — but it leaves anyone who needs to migrate a project to another NLE with a real sense of helplessness. Sooner or later someone needs that edit in Premiere Pro for finishing, delivery, or to fold into a larger project, and this is the messiest handoff in this guide. Here’s what’s realistic, and what isn’t.
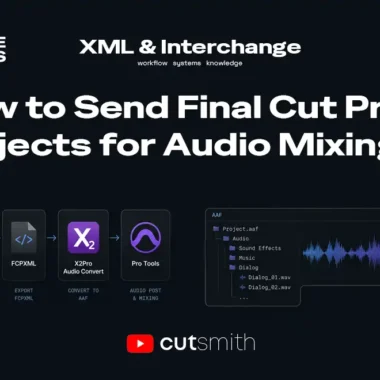
For the format background: XML, EDL, AAF & OMF →.
Why CapCut → Premiere is harder than NLE-to-NLE
The other moves in this cluster are between professional NLEs that all speak XML/AAF. CapCut is a different kind of app — consumer/creator-first, with its own internal project structure that doesn’t map cleanly onto Premiere’s. So the honest framing is: you are rarely moving the project; you are moving the footage and the cut decisions, and rebuilding the rest in Premiere.
What realistically travels
- The media and the rough cut/timing — the valuable part, the thing you don’t want to re-do by hand.
- What usually does not — CapCut’s effects, transitions, auto-captions styling, stickers, and templated elements. These are CapCut-specific and have no Premiere equivalent; expect to rebuild them.
Approach 1 — Manual export and rebuild (simple steps, heavy lifting)
No tools, just patience. The idea: export layers out of CapCut as video, and rebuild the stack in Premiere.
- Export a clean pass — the cut with no graphics, no subtitles. (Subtitles export easily on their own, so they’re not the problem.)
- Export the packaging separately. For stickers and overlay graphics, export a ProRes 4444 MOV to keep the alpha channel intact.
- The trick for stubborn cases: when an element won’t come out clean any other way, drop a solid green or blue sticker underneath it in CapCut, export that, and key it out in the receiving NLE like any green-screen plate. The same logic works for isolating audio and SFX passes.
- Stack the passes back up in Premiere.
It works. It’s also exactly as exhausting as it sounds — on anything longer than a short, you will not feel like a whole person by the end. Which is why I started building the second approach.
Approach 2 — CutSmith Timeline Bridge (the tool I’m building for this)
(Disclosure again: this is my project — open source, on GitHub, just released as v0.1.1 alpha.)
Timeline Bridge exists to do one thing: get your digital assets out of CapCut in an orderly way. Point it at a CapCut draft and it shows you exactly what that project uses — your media, your music, your SFX, with usage stats — then extracts what you select into a folder structure you choose (assets / sfx / music and so on), and hands you an XML you can import into Premiere.
What the current alpha honestly can and can’t do:
- ✅ Migrates a CapCut timeline to Premiere — including clip speed changes, which is more than some pro-NLE converters manage (XtoCC flattens speed ramps, for instance — see the cross-NLE guide →)
- ⚠️ One timeline at a time — multi-timeline projects aren’t supported yet
- ⚠️ Your own media only — it extracts assets that belong to you
- ❌ Stickers, filters, effects, and transitions don’t convert — those are CapCut-native and stay behind (see Approach 1’s keying trick if you must carry one)
It’s an alpha, and I’d rather you know its edges before you trust a deadline to it. It’s free and open source; if it breaks on your project, the issue tracker is where it gets better.
Captions: move them as SRT, not as timeline items
Whichever approach you take, don’t drag CapCut’s caption styling through the migration — export the subtitles as a file and rebuild styling on the other side. (For local AI transcription and bilingual subtitle generation, I also maintain CutSmith Subtitle Studio — free, open source; the full subtitle workflow lives in its own guide.)
How I’d frame the whole job
The honest summary after doing this both ways: treat a CapCut migration as an asset-and-decisions extraction, not a project move. Get the media out organized, get the cut timing across (Timeline Bridge), accept that CapCut’s native dressing — stickers, filters, effects, transitions — gets rebuilt in Premiere, and move subtitles as SRT. Budget the rebuild time up front and the job is fine; expect a lossless transfer and you’ll hate your week.
Common problems
- CapCut export won’t open in Premiere → it’s not a Premiere-readable project; bring media + rebuild. (See overview: XML, EDL, AAF & OMF →)
- Captions came across broken → redo in a subtitle workflow. (See: Subtitle workflow →)
Ethan Mai has spent 20 years in video post-production and now writes FreeVaults. Notes: @EthanMaiBuilds. Last updated: [date]